hMailServer is one of the best free email servers for Windows computers. We will show you how to create a private mail server with hMailServer for free.
ContentsWhat is a private mail server?How to create a private mail server for free1]Download hMailServer2]Install hMailServer on Windows 113]Run hMailServer as administrator4]Add domain5]Choose account directory6]Add an address with a suitable password7]Select SMTP option8]Add localhost to default domain9]Test your mail serverIs hosting a private mail server expensive?Is hMailServer safe use ?Whenever an email is received, it is usually first stored on an email server before the download process begins on your browser or email client. In most cases, these mail servers are operated by large companies such as Microsoft , Google , Yahoo and others.
These services are convenient because for the most part, it is not necessary to have their own servers. However, there are a few downsides to this if you're looking for a higher level of security for your emails. You see, companies have rules and regulations, which means government agencies can request access to your emails. With a private mail server, everything is then managed by you, the host. Therefore, you can expect enhanced privacy, security, and stability over public domains.
hMailServer is a free and open source mail server for Windows systems. It is used by Internet service providers, businesses, governments, schools, etc. It supports common email protocols (IMAP, SMTP and POP3) and can easily be integrated with many existing webmail systems. It has flexible score-based spam protection and can connect to your antivirus to scan all incoming and outgoing emails.
Follow the steps in this tutorial to create a private mail server with hMailServer for Windows computers for free:
The first thing to do here is to download hMailServer on your Windows 11 the computer. We can do this by visiting the official hMailServer download page and clicking the download link under Latest version . If you are using this tool for the first time, please stay away from Beta for better stability.
After downloading, you can go ahead and install the program on your computer. Now you can choose to use either the built-in database engine (Microsoft SQL Compact) or an external database engine in the form of (MSSQL, MySQL, PostgreSQL).
Add a password when prompted, then complete the installation.

The next step to do here is to open hMailServer as an administrator. Click on the administrator section then from there tap on the Connect bottom button. You will be asked to type the previously created password in order to access it.

After logging in with your password, it's now time to set up your private mail server. To begin this process, please click Welcome via the left pane, then select Add Domain from the right.
After that, please add your domain in the box and then make sure Authorized is checked before proceeding. Finally, press the save button to complete this section of the task.

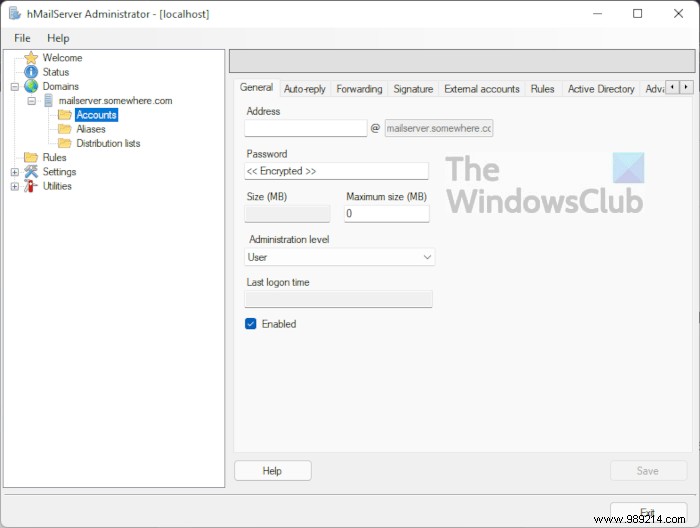
OK, so the next step is to select the domain you just added to hMailServer. We can do this by clicking on Domain via the left panel, then select Accounts from the list.
Through the Accounts directory section, you will want to add an address in the Address text zone. Going forward, this will work as your email address. From there, make sure you enter a strong password, then complete by pressing the save button.

From the left page, which you can also call the navigation bar, go ahead and select Settings in the list, then click Protocols . Once done, uncheck all options instead of SMTP then press save .

After completing the above, you should now click on Advanced under Settings tree. From Default domain box, type localhost and then your admin password in the box below. End this section by pressing save .
Finally, you now need to test your mail server by going to Utilities> Diagnostics . Select the domain you recently created, then press the Start button to start diagnostic tests.
You don't have to spend money to get the job done. You can use a tool called hMailServer to do the job. It's free and Open source , and from what we can tell, it works better than expected. The only expense here is making sure you have a strong internet connection and a computer that works 24/7, which will likely increase your electricity bill.
Yes, the app is safe to use, but we have to point out that the community is not as strong as it used to be. So don't expect constant updates, which could be a security issue. However, if you have the expertise to harden your personal mail server, you will encounter few security issues.