Dating back to the 1980s, IRC is one of the classic chat protocols that is still the driving force behind many modern online communities, including popular streaming platform Twitch. Today, there is no shortage of available IRC clients and servers. You can also setup your own IRC server with Raspberry Pi.
In this article, you will learn how to turn your Raspberry Pi into an IRC server.
There are two main advantages to creating your own server:
With your own IRC server, you'll have the freedom to assign your own moderators, create channels for topics that interest you, and have the final say on who can and can't join your server – great if you have any. sick of your online chats being hijacked by trolls, bots, spammers and other digital junk.
Are you worried that a third party will accidentally disclose your information, willfully sell it, or use it in targeted advertisements?
By running your own server, you can stay in control of all your data, from your username and email address to your IRC chat logs.
To complete this tutorial you will need:
To get started, connect the power cable and all peripherals to your Raspberry Pi.
Once your Raspberry Pi has booted up, make sure it is connected to the internet. Open Terminal and type the following commands to update the system:
sudo apt update &&sudo apt -y upgrade
If Raspberry Pi installs updates, restart the Pi before proceeding to the next step.
You will create an ab IRC server using the Ircd-Hybrid daemon. Install the Ircd-Hybrid package using the following command:
sudo apt install ircd-hybrid
This download may take a while, so now is the perfect time to grab a cup of coffee!

This file contains many settings, but at a minimum you need to make the following changes:
Scroll down to serverinfo { block and find the following:
name ="hybrid8.debian.local";

You must give your server a unique name. For example:
name ="JessicaServer.irc";

You will need to provide a short description that will be displayed each time someone connects to your IRC server.
Find the following:
description ="ircd-hybrid 8.1-debian";

Replace this text with your own description. For example:
description ="Raspberry Pi IRC Server";
Scroll down to the next section:
These two lines describe the network your server is running on, so you should update it to reflect your specific network. For example:
network_name ="MyNetwork"; network_desc ="This is my Raspberry Pi IRC Network";

By default, Ircd-Hybrid allows 512 connections at a time. If you want to change this limit, find the following line:
You can now increase or decrease this limit of 512 users. In this case, I only allow a maximum of 100 connections to my IRC server:
default_max_customers =100;
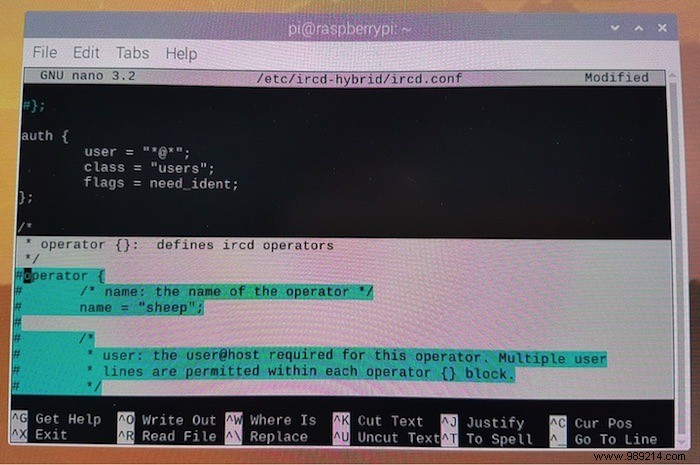
The next step is to set some parameters for the operator. Scroll to operator { to block. Note that this section may require an uncomment, so remove the first # symbol in each line.

This done, find the following line:
name ="sheep";
Replace this line with the name you want your operator group to have:
name ="operator";
You need to specify who can run the operator command by editing the following line:
user ="*@192.0.2.240/28";
This will allow anyone to access the operator, if they have the correct credentials:
user ="*@*";
Finally, add the encrypted password you generated earlier. Find the following:
password ="xxxxxxxxxxxxx";
Be sure to replace this line with the encrypted password and not the plain text version!
Once you are satisfied with the information you have entered, save the configuration file by pressing the Ctrl button + O keys then Ctrl + X close.
Restart the Hybrid-IRCD server:
sudo /etc/init.d/ircd-hybrid restart
Once the server has restarted, it is ready to use!
You can connect to your IRC server using any IRC client. I use mIRC, but other popular alternatives include WeeChat, and LimeChat for macOS.
To connect to your IRC server, launch the client of your choice, then choose to add a new server. Depending on your IRC client, you should now be prompted for the following information:
hostname -I order.
Click "Add" to be able to connect to your IRC server.

As you can see, it's pretty simple to set up an IRC server on your Raspberry Pi. There are also tons of things the Raspberry Pi can do, like act as a captive portal Wi-Fi hotspot , music server or even personal web server.
Check out our Raspberry Pi channel for more tutorials.
ContentsWhy should I set up my own IRC server?1. Full control over the chat2 experience. Take control of your dataWhat you'll needGetting started:Setting up your Raspberry PiInstalling the Ircd-Hybrid serverSecure your server:Creating an encrypted passwordSetting up your IRC serverGive your IRC server a name:Provide a descriptionTell us about your networkFix it you limitsCreate your operatorRun your IRCmIRC server:Connect to your Raspberry Pi server