Do you want to greet each user with a personalized welcome message in WordPress? Greeting users with a welcome message can help drive engagement on your website. It can also be used to generate leads and increase sales. In this article, we will show you how to greet each user with a custom welcome message in WordPress.
Not all websites need to greet users with a personalized welcome message. However, if you're running an online store, trying to generate leads, or increase user engagement, a custom welcome message can come in handy.
There are different types of welcome messages that you can use. The goal here is to offer users a lot of value with each message. For example, you can offer them discounts, live help, encourage them to ask questions, and more.
You can use integrations to connect welcome messages with your email service provider, live chat service, or contact form plugin.
With that said, let's see how to easily greet each user with a custom welcome message in WordPress.
For this method, we will use OptinMonster. It is the world's most popular lead generation software that helps you convert website visitors into subscribers and customers.
First, you need to sign up for an OptinMonster account. It is a paid service, but they also offer a limited plan with unlimited duration.
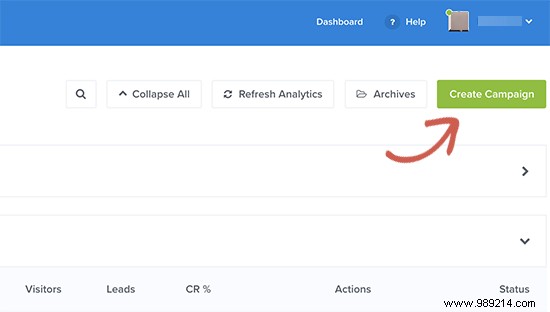
Once you've signed up, you'll be taken to your OptinMonster dashboard where you'll need to click the 'Create Campaign' button.
Next, you need to choose a campaign type and template. OptinMonster comes with different campaign types, and you can use any of them to greet users with a welcome message in WordPress.
For the sake of this article, we will use the Flatland templated slider campaign type.

You will then be asked to give your campaign a name and select a website where you want to run this campaign. Click the Select Website field and then click 'Add Website' to add a new website.

After that, click the 'Start Building' button to continue.
OptinMonster will now launch the drag and drop editor, where you can simply point and click on any element to edit it. You can add blocks, columns, and elements with text, video, buttons, registration fields, and more.

Simply click on the text fields to add your own welcome message to greet new users. You can also integrate it with your email service provider by clicking the 'Integrations' tab at the top.

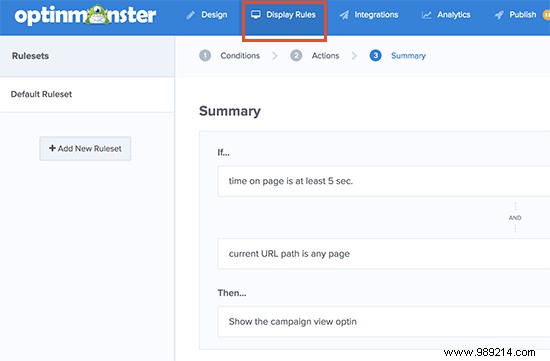
Next, you need to switch to the "Display Rules" tab to select when you want to display the greeting. OptinMonster comes with a ton of options that you can use to create less intrusive and highly engaging messages.
Once you've finished designing your custom welcome message, click the Publish button at the top and toggle the 'Status' option to live.

You are now ready to add this custom welcome message campaign to your website.
Switch to your WordPress admin area to install and activate the OptinMonster plugin. For more details, check out our step-by-step guide on how to install a WordPress plugin.
Upon activation, the plugin will add a new menu item labeled "OptinMonster" to the WordPress admin sidebar. Clicking on it will take you to the plugin settings page.
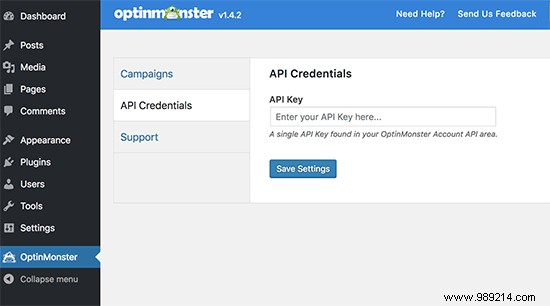
You will be prompted to enter your API key. You can find this information in your account on the OptinMonster website.
Don't forget to click the Save Settings button after entering your API key.
Next, you need to click on the 'Campaigns' tab. If you can't see your campaign listed, click the Update Campaigns button.
After that, click the 'Go Live' link next to the campaign you just created.

You can now visit your website to see your custom welcome message in action.

You can use OptinMonster to greet users with different welcome messages based on visits, time spent, login status, referral source, or use of page-level targeting for your landing pages.
LiveChat Inc is the best live chat support software for WordPress websites. It allows you to create beautifully designed, eye-catching live chat buttons and live chat support on your WordPress site.
You can customize the welcome message, display your own buttons, upload your logo, display agent profiles, and more.
LiveChat is a paid solution (starting at $16.99 per agent). They also offer a 30-day free trial that allows you to review the features and see if it's a good fit for your business.
First, you need to visit the LiveChat website and sign up for an account.

After creating your account, you will be taken to your LiveChat Dashboard. Next, you need to click on the settings tab to customize the appearance of the LiveChat button.

From here, you can choose the colors and theme of the chat window. After that, click the 'Advanced Window Settings' link to upload your own logo and add your social media profiles.
Next, you need to switch to the Commitment »Greetings section. By default, LiveChat enables some greetings that are displayed based on a few simple rules, such as time spent on the site, page views, returning visitor, and more.

You can click on these greetings to edit them and add your own personalized welcome message. También puede eliminarlos o hacer clic en el botón 'Agregar nuevo saludo' para crear un nuevo saludo personalizado.
Podrá seleccionar cuándo mostrar un saludo utilizando las reglas de visualización. También puede combinar diferentes reglas para combinar y crear saludos personalizados altamente dinámicos.

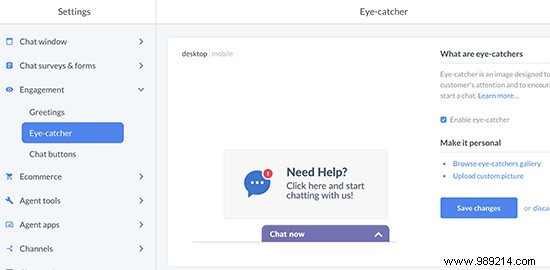
A continuación, debe seleccionar un llamativo. Estos atractivos son imágenes que se muestran cuando se minimiza la ventana de LiveChat.
LiveChat viene con varios llamativos listos para usar que puedes usar. También puedes subir tus imágenes para usarlas como llamativas..
Una vez que esté satisfecho con el diseño y la apariencia de su ventana de LiveChat y saludos personalizados, estará listo para agregarlos a su sitio web de WordPress.
Vuelve a tu área de administración de WordPress para instalar y activar el complemento LiveChat. For more details, check out our step-by-step guide on how to install a WordPress plugin.
Tras la activación, el complemento agregará un nuevo elemento del menú etiquetado LiveChat a la barra lateral de administración de WordPress. Haciendo clic en él te llevará a la página de configuración del plugin..

Continúe y haga clic en el botón 'Iniciar sesión con LiveChat' para conectar su sitio de WordPress a su cuenta de LiveChat.
Una vez conectado, verá algunos ajustes de pantalla muy básicos. Puede desactivar LiveChat en el móvil, desactivar los sonidos u ocultarlo para los usuarios que no hayan iniciado sesión. Si no está seguro, le recomendamos que deje estas opciones como están.

Ahora puede visitar su sitio web en una nueva pestaña del navegador para ver el botón LiveChat en acción. Saludará a los usuarios con el atractivo que seleccionó y mostrará un saludo de bienvenida personalizado basado en las reglas que elija en la configuración.

Esperamos que este artículo le haya ayudado a aprender cómo saludar a cada usuario con un mensaje de bienvenida personalizado en WordPress. También puede querer ver nuestro artículo sobre cómo rastrear la participación de los usuarios en WordPress usando Google Analytics.
If you enjoyed this article, please subscribe to our WordPress YouTube Channel video tutorials. You can also find us on Twitter and Facebook.