Chances are you've seen a "hardware acceleration" option when using various apps and devices. You might even need to turn it on or off to improve performance/avoid bugs in one of your favorite apps, but maybe you didn't know why.
ContentsDefinition of hardware accelerationWhy you may need to turn it offWhen you should turn it onHow to check if hardware acceleration is turned on in WindowsWords of farewellIn this article, we explain everything you need to know about hardware acceleration and whether or not your apps can benefit from using it.
Hardware acceleration is a term used to describe tasks that are offloaded to devices and hardware that specialize in it. By default in most computers and applications, the processor is taxed first before other hardware components. While this is fine for most general use cases, especially if someone has a powerful CPU, there are others where it might make sense for your computer to use the other components of your system. This is where hardware acceleration comes in, and we'll give some common use cases:

Here are the cases where you should probably disable hardware acceleration:
Of course, hardware acceleration isn't that bad. When you work as expected, it's actually pretty awesome.

Here are some cases where you need to enable hardware acceleration in your applications:
In short, enable hardware acceleration wherever you can if you have good hardware and disable it if you experience stability issues/bugs.
At the operating system level, hardware acceleration will be automatically enabled on your operating system and you probably won't be able to change it. What you can do, however, is make sure hardware-accelerated GPU scheduling is enabled.
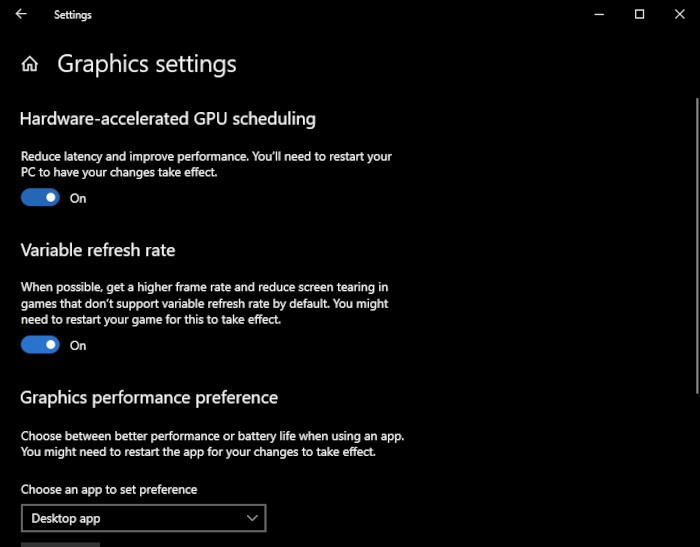
Hardware Accelerated GPU Scheduling is a feature added in new versions of Windows 10 that reduces GPU latency across the board and can even improve performance in a few scenarios.
To enable hardware-accelerated GPU scheduling, simply open Start, type "Graphics settings" and click on the corresponding entry.

In the window that appears, click the sliders for "Hardware Accelerated GPU Scheduling" and "Variable Refresh Rate", if visible. You will need to reboot after making this change if you wish to apply it.

If none of the options are visible and you've made sure your graphics drivers are up to date, your card may simply not support those features. At the time of writing, there are few known reasons not to enable them when available, but you can disable them if you run into problems.
Note :If this feature does not appear in Windows for you, you could be putting your machine at risk by forcibly enabling it in the registry. Be careful!
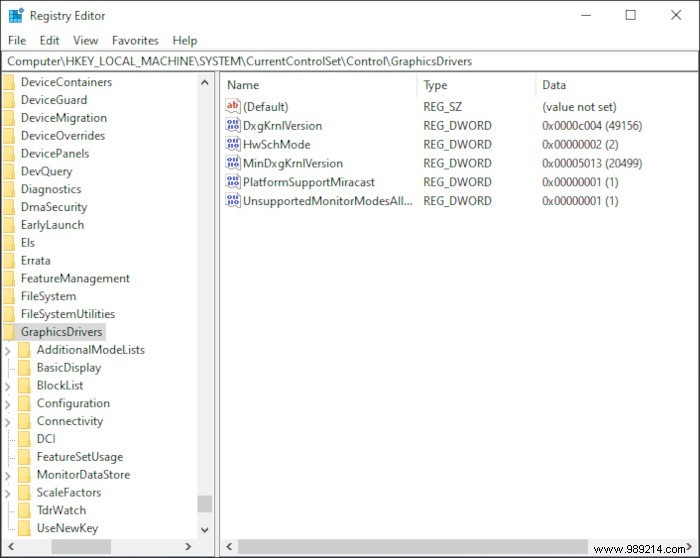
If for some reason you want to force this option through the registry, open Start, then type "Registry" and click "Registry Editor".

Once in your registry editor, you'll want to go to
ComputerHKEY_LOCAL_MACHINESYSTEMCurrentControlSetControlGraphicsDrivers
in the address bar.

Right-click "HwSchMode", click "Edit", then set it to 2 for Enabled or 1 for Disabled if desired.

After a reboot, you should be done!
We hope this article has helped you better understand hardware acceleration and how to use it in your favorite apps. If you're looking to buy a powerful graphics card that can support hardware acceleration, check out our graphics card buying guide here.
Image credit:mrtpage at WikiMedia Commons